My first attempt was to buy two 20" HP displays on Ebay with a fabulous resolution of 1600x1200. Unfortunately the polarization of these displays is unsuitable for the planar design, because it is horizontal or vertical and therefore the beamsplitter between the monitors is not able to change the direction of the polarization.
My 2nd attempt was to buy 2 cheap Eizo 15" screens which apparently have a 45 degree polarization and therefore seemed promising. To make the start easier, I decided to build this thing using a wall-mount for a satellite-dish as a basis. The screens itself were mounted using standard wall-mounts for LCD displays which I screwed into the steel satelite-dish holder. After a first serious measurement I found that I had to extend the upper arm quite a bit to be able to mount the beamsplitter in the bisecting angle. To this end I used a piece of standard aluminum profile that I had lying around (the same stuff I used to build the Fuji rig). The beamsplitter was made of half-silvered mirror that I was able to get from a local glass&mirror shop. I connected it to the monitor-stand using an aluminum picture frame and some standard parts from a DIY shop. And finally, this is the end result (in side-by-side stereo, of course ;-):
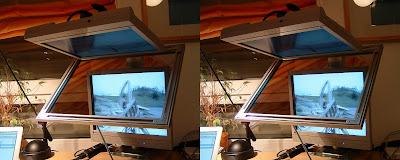

The initial test showed that the half-silvered mirror probably has a reflection/transmission ration of more than 50% because the transmitted picture was visibly weaker than the reflected one from the top monitor. However this could be easily compensated for by reducing the brightness of the top monitor correspondingly. An advantage of this situation is that ghosting resulting from reflection on the 2nd (non-coated) glass surface is not visible at all, because the brightness of the ghost reflection is much less compared to the primary reflection. This way I did not need to spend a fortune on a professional-grade beamsplitter with a anti-reflective coating on the backside.
So far I am absolutely happy with this setup.
2 Kommentare:
Dear 3dBruce,
I am very impressed with your IXUS 55 twin rig and the way you've connected the two shutter buttons of the cameras to avoid using the external battery and switch. I am running SDM on a pair of A460s and would like to do the same thing. How would I make the change to the internal synch routine of SDM that you did?
I'm new to SDM and don't understand the internal working, so I need an idiot's guide! (My pair of A460 operate perfectly from the battery and switch connected to the USB sockets.)
Could you e-mail me at jackcolbran@hotmail.com?
Thanking you in anticipation,
Jack Colbran,
U.K.
3D field monitor
http://3deyes2010.blogspot.com/2011/09/3d-eyes-vison-3dmonitor.html
3Deyes 8" Full HD 3D monitor
High quality 50/50 stereoscopic mirrors used
Dual Full HD LCD, Dual HDMI Port and composite supported
cost $1,900 + S&H
Kommentar veröffentlichen